22 November 2015

APEX 5.1: features shown at DOAG

On the last day of the DOAG conference, in the last time slot Patrick Wolf from the APEX development team did a session on the next release of APEX.
For the developer the most significant change in the Page Designer is the component view. This will be a tab in the center pane instead of a completely separate page.

Most time was spent showing the new Interactive Grid. The Interactive Grid will be a, loosley speaking, combination of an Interactive Report and a Tabular form. The menu from the Interactive Report also gets a make over. The functionality to format the result set (like pivot, group by) will be taken out of the action-menu and will get its own button next to the search bar.

Initially the Interactive Grid will be read only (like the Interactive Report) and can be set to allow data changes. As a developer you can specify which operations are allowed and add authorization to each of the DML. What is really neat is that you can also specify which column can be edited.
From a right click menu in the Interactive Grid several actions can be performed like adding or removing a row.

It is also possible to specify what item type will need to be used when you edit the field.

After this demo, Patrick showed the master-detail functionality, which also allows editing in the master and the detail. He described that only the changes are sent to the database when the save button is pressed.

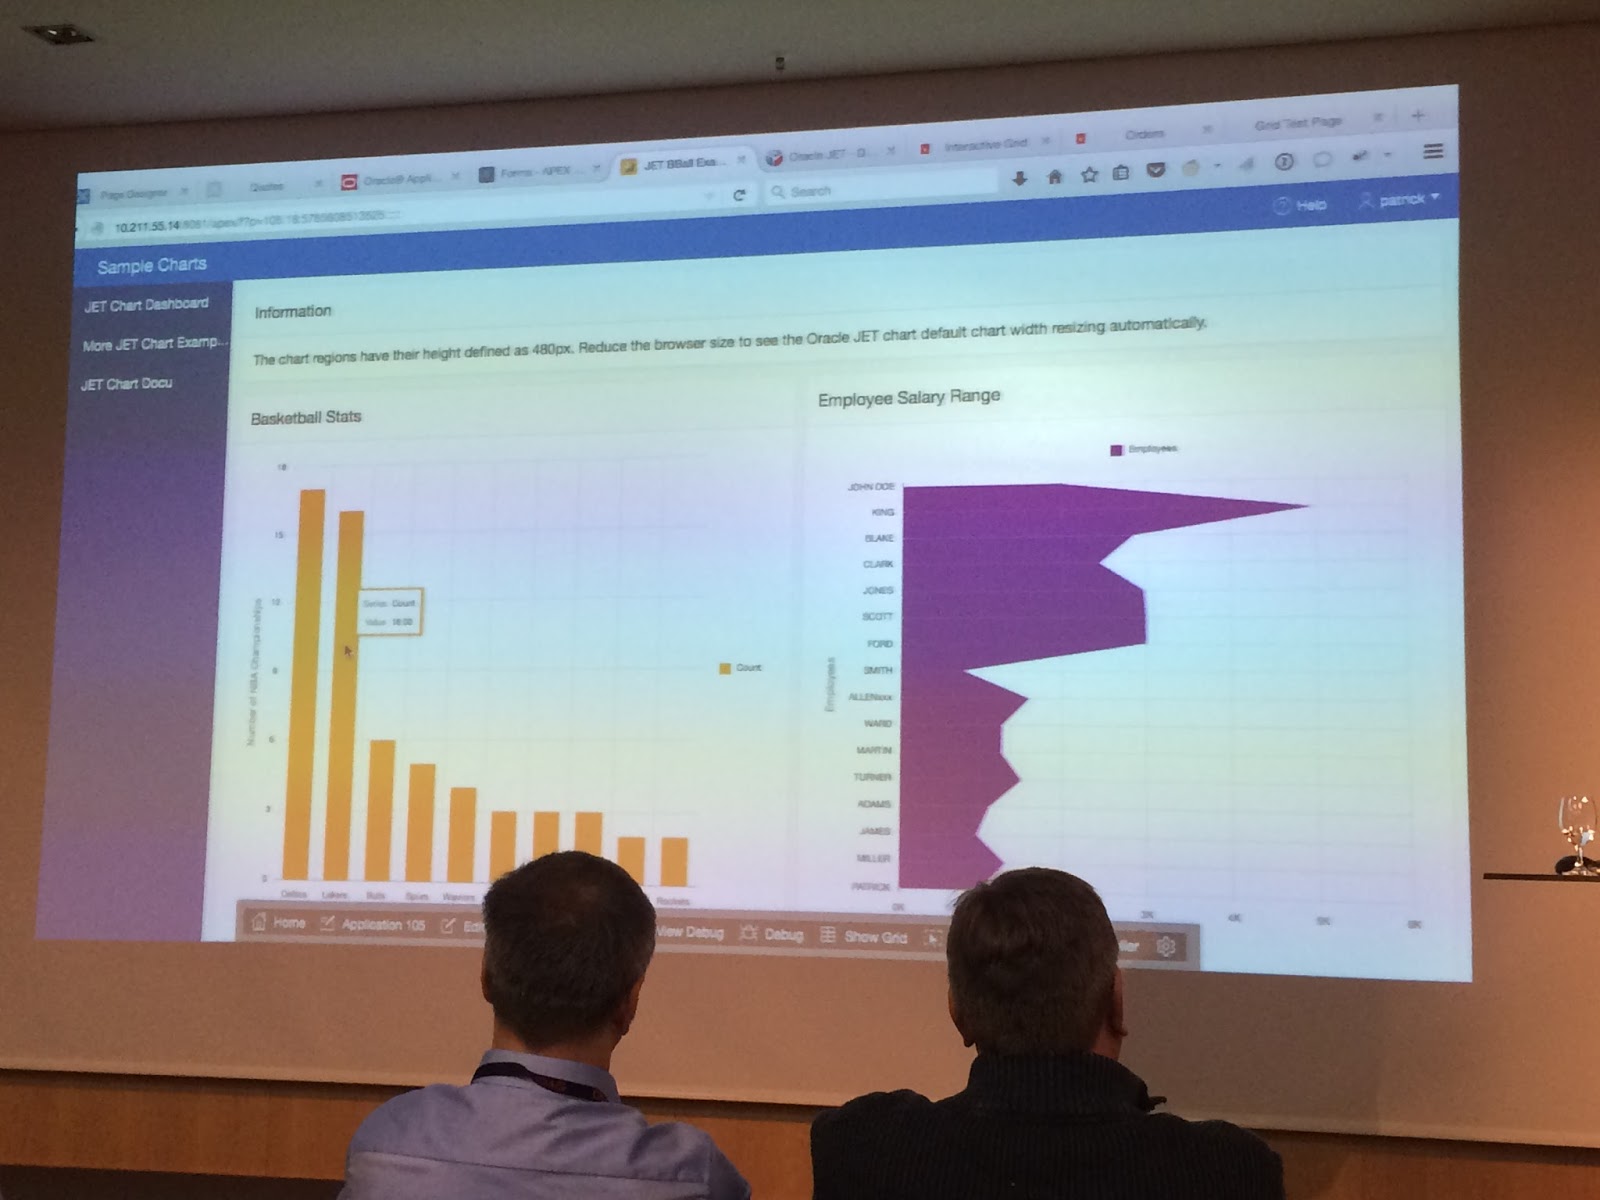
Of course the new charting engine was also shown and emphasized that not all chart-types available in Oracle JET will be created in APEX through a declaritive wizard.
In case you hadn't heard: the new charting engine for APEX will be using Oracle JET.
What surprised me was that Patrick mentioned that some charts in the JET toolkit don't offer the functionality which is currently provided in AnyChart (the current charting engine) and that in some cases they will continue to use AnyChart for those components. If I remember correctly this was the case for the maps. The European maps aren't as detailed as the APEX team would like them to be, but who knows by the time that APEX 5.1 is ready for release the JET charts might be up to par.

Declarative column group headers, the ability to move columns and creating an overflow report (just like the ones that you know from Oracle Forms) were also briefly demonstrated by Patrick.
All in all, a great last session showing a glimpse into the future of Oracle APEX.
Of course all of what is shown might not be in APEX 5.1, the first slide (after the title slide) was Oracle's safe harbor statement.

16 October 2015

Updating Identity Columns

During my presentation "Oracle 12c for Developers" at the Sloveninan and Croatian User Groups I got the same question twice about Identity Columns:

Is it possible to update an Identity Column?
During the presentation I show how it is not possible to insert a value for a "Generated Always Identity" column.
Let's take a look at an example:
SQL> create table t
  2  (id number  generated as identity
  3  ,name varchar2(35)
  4  );

Table created.

SQL> insert into t(name) values ('hello')
  2  /

1 row created.
   
In the first section the table is created with a "Generated Always Identity" column.
The second part shows that you can insert into the table, as long as the identity column isn't used in the insert statement. Trying to do so will lead to an exception.
SQL> insert into t values (1, 'World')
  2  /
insert into t values (1, 'World')
*
ERROR at line 1:
ORA-32795: cannot insert into a generated always identity column
   
The same is true when you attempt to insert a record type:
SQL> declare
  2     r t%rowtype;
  3  begin
  4     r.id := 42;
  5     r.name := 'world';
  6     insert into t values r;
  7  end;
  8  /
declare
*
ERROR at line 1:
ORA-32795: cannot insert into a generated always identity column
ORA-06512: at line 6
   
Now back to the question, what about an update? Let's try some different methods:
SQL> update t
  2     set id = id
  3  /
   set id = id
       *
ERROR at line 2:
ORA-32796: cannot update a generated always identity column
SQL> update t
  2     set id = id + 1
  3  /
   set id = id + 1
       *
ERROR at line 2:
ORA-32796: cannot update a generated always identity column
SQL> update t
  2     set id = id + 0
  3  /
   set id = id + 0
       *
ERROR at line 2:
ORA-32796: cannot update a generated always identity column
   
In short: updating a "Generated Always Identity" column is not allowed either.
One final remark: an identity column is not the same as a primary key. If you want to use a "Generated Always Identity" column as your primary key, then you will have to specify that explicitly.
SQL> create table t
  2  (id number  generated as identity primary key
  3  ,name varchar2(35)
  4  );

Table created.
   

12 October 2015

Busy October

October is going to be a busy month, and it already started.
The First one is the Slovenian User Group immediately followed by the Kroatian User Group.

For the Sloveninan User Group (SIOUG) I will do the following presentations:

    • Oracle 12c for Developers
      Analytic Functions: Unleash the Power
      APEX, Node.js and HTML5: Magic!
  • On top of that I was asked to join the "Ask the Experts" panel on APEX.

    In Kroatia (for the HrOUG) these presentations are on the agenda:

    • Oracle 12c for Developers
      Analytic Functions: Unleash the Power
  • Next week wednesday Oracle Open World kicks off with the ACE Director Briefing and of course OOW itself.
    On the Usergroup day (Sunday) I will participate in two presentations. First "APEX, Node.js and HTML5: Magic!" and later that day I have a 7-minute session during the EOUC "12 more things about Oracle 12c".
    The last session is going to be a fun one. As the title claims there are going to be more than 12 topics in one session with a lot of excellent speakers.

    Jonathan Lewis Less well-known enhancements of the 12c Optimizer
    Julian Dontcheff Oracle Database 12c In-Memory Advisor
    Gurcan Orhan Adapting DB 12C In-Memory to ODI 12c
    Osama Mustafa How to plugin a non-CDB database to a Container Database (CDB)
    Bjoern Rost How ASM has reached maturity in 12c
    Alex Nuijten JSON in the database
    Brendan Tierney Running R in the Database using Oracle R Enterprise
    Douwe Pieter van den Bos Maximum security architecture
    Christian Antognini Real-time Monitoring of Composite Database Operations
    Martin Widlake 12C - Clustered Data aware TABLE_CACHED_BLOCKS
    Heli Helskyaho Design your 12c Databases using Oracle SQL Dev Data Modeler
    Oded Raz Oracle 12c Privileges Analysis
    Tim Hall
    Alex Zaballa
    Maria Colgan
    Lucas Jemella

    I believe you can still register for this session.
    More Than Another 12 on Oracle Database 12c [UGF3190] Moscone South Room 306 time 13:30 - 15:15

    By the time OOW is done, so is October.

    07 August 2015

    Rounding Amounts, the missing cent: with the MODEL clause

    Rounding amounts may lead to rounding-issues, I have written how this may be resolved in a previous blogpost using some analytic functions.
    Playing around a little bit, I also came up with a method to resolve the rounding difference with the MODEL clause.

    To create an example, first let's create a table with only three records in it.

       SQL> create table t
         2  as
         3  select rownum + 42 id
         4    from dual
         5  connect by level <= 3
         6  ;
    
       Table created.
       SQL> select *
          2    from t
          3  /
    
                    ID
            ----------
                    43
                    44
                    45
    

    In the code below the DIMENSION is the ID from the table. The measures (the "cells" that we can manipulate in the MODEL clause) are used as follows

    Amount The amount that is the result of the division per record
    Total The amount that we want to divide over the records
    Diff Placeholder for the difference between the sum of the rounded amounts and the amount that needs to be divided.
    Indicator We need to know the highest value for the DIMENSION (to add the difference to). Since we can't determine the highest value of the DIMENSION, this MEASURE is used for that.
    When we execute the query we get the following results, except for the DIMENSION column (ID) and the MEASURE Indicator all columns are empty.
          SQL> select *
            2    from t
            3  model
            4  dimension by (id)
            5    measures (cast (null as number) amount
            6    ,cast (null as number) total
            7    ,cast (null as number) diff
            8    ,id indicator
            9    )
           10  rules (
           11  )
           12  /
    
           ID           AMOUNT      TOTAL       DIFF  INDICATOR
          ---------- ---------- ---------- ---------- ----------
                  43                                          43
                  44                                          44
                  45                                          45
    
    It is time to add some rules to the MODEL clause.
    The first rule is to add the amount which needs to be divided.
    total [0] = 100   
    
    This will add a "magic" row to the resultset with Dimension 0 where the measure column total is filled with 100, the amount that we want to divide.
    The reason I call it a "magic" row is, is because it is not in the table and made up. In this row I will store some values that I need to do my calculations and such.
    The second rule is
     indicator [0] = max (indicator) [any]
     
    In this rule I will determine which row is the "last" row, the one with the highest ID.
    Next rule is to do the actual calculation: divide the amount by the number of rows in the resultset. Of course don't count the "magic" row, hence the condition id > 0.
     amount[id > 0] = round (total[0]/(count(*)[id > 0]), 2)
     
    To determine the total of the rounded values, we will use the following rule:
     amount[0] = sum (amount)[id > 0]
     
    This total amount is also placed on the "magic" row.
    Calculating the difference between the amount that we want to divide and the actual divided amount is done in the following rule:
     diff[0] = total[cv()] - amount[cv()]
     
    The difference is added to the "last" row in the last rule:
     amount[indicator[0]]  = amount[cv()] + diff[0]
     
    To see the complete query in action:
       SQL> select *
         2    from t
         3  model
         4  dimension by (id)
         5    measures (cast (null as number) amount
         6    ,cast (null as number) total
         7    ,cast (null as number) diff
         8    ,id indicator
         9    )
        10  rules (
        11    total [0] = 100
        12   ,indicator [0] = max (indicator) [any]
        13   ,amount[id> 0] = round (total[0]/(count(*)[id>0]), 2)
        14   ,amount[0] = sum (amount)[id>0]
        15   ,diff[0] = total[cv()] - amount[cv()]
        16   ,amount[indicator[0]]  = amount[cv()] + diff[0]
        17  )
        18  /
    
           ID     AMOUNT      TOTAL       DIFF  INDICATOR
       ---------- ---------- ---------- ---------- ----------
               43      33.33                               43
               44      33.33                               44
               45      33.34                               45
                0      99.99        100        .01         45
       
    As you can see in the output above the values are rounded (in the AMOUNT column) and the last row takes the difference.
    But also our "magic" row is added to the output, to filter that one out of the resultset simply add a where clause.
          SQL> select id
            2      ,amount
            3    from (select *
            4    from t
            5  model
            6  dimension by (id)
            7    measures (cast (null as number) amount
            8    ,cast (null as number) total
            9    ,cast (null as number) diff
           10    ,id indicator
           11    )
           12  rules (
           13    total [0] = 100
           14   ,indicator [0] = max (indicator) [any]
           15   ,amount[id> 0] = round (total[0]/(count(*)[id>0]), 2)
           16   ,amount[0] = sum (amount)[id>0]
           17   ,diff[0] = total[cv()] - amount[cv()]
           18   ,amount[indicator[0]]  = amount[cv()] + diff[0]
           19  ))
           20  where id> 0 order by id
           21  /
    
                  ID     AMOUNT
          ---------- ----------
                  43      33.33
                  44      33.33
                  45      33.34
          

    Links

    05 August 2015

    Rounding Amounts, the missing cent

    Dividing a certain amount over several rows can be quite tricky, simply rounding can lead to differences.
    Let me try to explain what I mean. When you need to divide 100 by 3, the answer is 33.333333333333 (and a lot more threes).
    Money only goes to cents, so if each one gets 33.33, there is a cent missing. (3 times 33.33 equals 99.99)
    To solve this cent-problem, we decide that the difference should be added (or subtracted) on the last row.

    To create an example, first let's create a table with only three records in it.

       SQL> create table t
         2  as
         3  select rownum + 42 id
         4    from dual
         5  connect by level <= 3
         6  ;
    
       Table created.
       SQL> select *
          2    from t
          3  /
    
                    ID
            ----------
                    43
                    44
                    45
    

    In the code below the amount that we want to divide is included in the query on line 2. On line 3 the analytic counterpart of the COUNT(*) function is used to determine the number of records in the resultset. On line 4 you can see the result when you round the amount divided by the number of records in the resultset. All records show 33.33, just as we expected.
    Line 5 shows a trick using the LEAD function to identify the last record.

          SQL> select id
            2      ,100 amount
            3      ,count(*) over () entries
            4      ,round (100 / count(*) over (), 2) rounded
            5      ,lead (null, 1, 'x') over (order by id) lastrow
            6    from t
            7  /
    
           ID            AMOUNT    ENTRIES    ROUNDED L
          ---------- ---------- ---------- ---------- -
                  43       100           3      33.33
                  44       100           3      33.33
                  45       100           3      33.33 x
       

    Because we identified the last record in the resultset, it is easy to calculate the difference between the amount that we want to divide and the total of the rounded amount.
    In the code below this is done on lines 6 through 9. In plain English it reads: "Take the rounded amount and add to that the difference between the amount and the sum of the rounded amount, but only if you're on the last record"

    SQL> select id
      2      ,amount
      3      ,entries
      4      ,rounded
      5      ,sum (rounded) over (order by id) running_rounded
      6      ,rounded + case
      7          when lastrow = 'x'
      8          then amount - sum (rounded) over (order by id)
      9          else 0 end final_amount
     10    from (
     11  select id
     12      ,100 amount
     13      ,count(*) over () entries
     14      ,round (100 / count(*) over (), 2) rounded
     15      ,lead (null, 1, 'x') over (order by id) lastrow
     16    from t
     17  )
     18  /
    
            ID     AMOUNT    ENTRIES    ROUNDED RUNNING_ROUNDED FINAL_AMOUNT
    ---------- ---------- ---------- ---------- --------------- ------------
            43        100          3      33.33           33.33        33.33
            44        100          3      33.33           66.66        33.33
            45        100          3      33.33           99.99        33.34
    
    As you can see in the result, the missing cent is added to the last record.
    Looking at the query again, I realize that it is not necessary to use the ORDER BY in the SUM function.

    Links

    20 July 2015

    Object Type with Optional Attribute: Extra Constructor Function

    When you have to create stored procedures which need to be called from an Oracle Service Bus, the most covenient way (at least for the one creating the mapping between the incoming message and the stored procedure) is to use Object Types.
    The "downside" is that you might need lots of Object Types and Nested Table Types to get the right structure.
    If you are unfamiliair with this technique, there are some links at the bottom of this article.

    Sometimes not all attributes of the Object Types are being passed down to the stored procedure, especially when attributes are optional.

    Although it appears to be possible to create an Object Type like the following, it will not work:

      SQL> create or replace type test_ot
      2  as object
      3  (name varchar2(20)
      4  ,description varchar2(150) null
      5  );
      6  /
    
    Type created.
       
    Notice that the Object Type named TEST_OT has two attributes of which the second one (description) is optional.
    When you try to create an instance of that Object Type, you will get an exception.
          SQL> declare
      2   o test_ot;
      3  begin
      4   o := test_ot ('name');
      5  end;
      6  /
       o := test_ot ('name');
            *
    ERROR at line 4:
    ORA-06550: line 4, column 9:
    PLS-00306: wrong number or types of arguments in call to 'TEST_OT'
    ORA-06550: line 4, column 4:
    PL/SQL: Statement ignored
       
    Both attributes need to be specified to instantiate the Object.
          SQL> declare
      2   t test_ot;
      3  begin
      4   t := test_ot ('a name','some description');
      5   dbms_output.put_line (t.name||' - '||t.description);
      6  end;
      7  /
    a name - some description
    
    PL/SQL procedure successfully completed.
       
    But this is not what we wanted, we want to instantiate the Object Type with only one attribute.
    To accomplish this, you would need to create a new CONSTRUCTOR function for the Object Type.
          SQL> create or replace type test_ot
      2  as object
      3  (name varchar2(20)
      4  ,description varchar2(150)
      5  ,constructor
      6   function test_ot (name in varchar2)
      7    return self as result
      8  );
      9  /
    
    Type created.
       
    Now the Object Type also needs an Object Type Body:
          SQL> create or replace type body test_ot
      2  as
      3   constructor
      4   function test_ot (name in varchar2)
      5      return self as result
      6   is
      7   begin
      8      self.name := name;
      9      self.description := 'created by constructor';
     10      return;
     11   end test_ot;
     12  end;
     13  /
    
    Type body created.
       
    This Constructor Function takes one argument, just for the name. In the Constructor Function the description attribute gets a static value. Of course this can also be a NULL.
    Now it is possible to instantiate the Object Type with only one argument.
          SQL> declare
      2   t test_ot;
      3  begin
      4   t := test_ot ('a name');
      5   dbms_output.put_line (t.name||' - '||t.description);
      6  end;
      7  /
    a name - created by constructor
    
    PL/SQL procedure successfully completed.
       

    Links

    02 July 2015

    Conditional Compilation and Static Boolean

    One of my pet-projects is LoggerUtil, which is a utility for Logger, which is an excellent logging tool for PL/SQL.
    This post is not about Logger, but some dealings with Conditional Compilation.

    With Conditional Compilation you can create a single code base to handle different functionalities depending on compiler flags.
    The latest addition to LoggerUtil was a method to create a custom template. For this to work, LoggerUtil depends on a certain Logger Release (where issue #103 is implemented). The dependency lies in the fact that the custom template is stored in the LOGGER_PREFS table and before issue #103 was resolved there was no way to add data to the LOGGER_PREFS table (or at least not a supported way).

    Conditinal Compilation is just what the doctor ordered. With a Conditional Compilation directive you can check if Logger is at least version 3, so we can have a supported way of writing into the LOGGER_PREFS table. Sounds easy enough.

    And this is where I made some discoveries about Conditional Compilation.

    Let's begin with a package specification with only CONSTANTS in there.

          create or replace package constants_pkg
          is
             version   constant varchar2(10) := '1.2.3';
             major_num constant number := 1;
             major_int constant pls_integer := 1;
             major_vc  constant varchar2(1) := 'a';
          end constants_pkg;
       
    There are a few variations in there, starting with the current method that Logger has implemented the version number (the constant called VERSION).
    Second there is a NUMBER constant.
    Third is an PLS_INTEGER constant.
    Fourth a variation to the first constant, just one character.

    Following is a procedure, called conditional (how appropriate):

          create or replace
          procedure conditional
          is
          begin
             $if constants_pkg.version like '1%'
             $then
                dbms_output.put_line ('string, with LIKE comparison');
             $end
             dbms_output.put_line ('This will always be displayed');
          end conditional;
       
    The $IF, $THEN, $END are part of the syntax used for Conditional Compilation.
    On line 5 the packaged constant is checked if the string start with a 1. When it does, line 7 is included in the compiled code. If the packaged constant doesn't start with a 1 then line 7 is not included in the compiled code.
    You might say: "Should you do a comparison like this"
          $if to_number (substr (constants_pkg.version, 1, 1)) > 1
       
    and you would be right, but... for this example it doesn't matter as both don't work. When you try to compile the code, you will see the following error:
    Errors for PROCEDURE CONDITIONAL:
    
    LINE/COL ERROR
    -------- -----------------------------------------------------------------
    4/8  PLS-00174: a static boolean expression must be used
       

    So my next attempt at getting this to work, was using the full version constant:

          $if constants_pkg.version = '1.2.3'
       
    With the same results, the same compilation error.

    What about just a single character string?

          $if constants_pkg.major_vc = '1'
       
    ...Nope, again the same compilation error.

    Next up, try a NUMBER constant instead:

          $if constants_pkg.major_num = 1.0
       
    I thought the ".0" at the end could make a difference, but alas.. same compilation error.

    Last attempt: the PLS_INTEGER:

          $if constants_pkg.major_int = 1
       
    This may not come as a surprise now, but this works. :D
    This is similar to the way that Oracle does it itself.

    When you want to know which release of the Oracle database you are on, you can check DBMS_DB_VERSION. There are constants defined in DBMS_DB_VERSION which you can use with Conditional Compilation.

    So Martin, if you are still reading: Can I have the version as a PLS_INTEGER, please?

    Links to related articles

    1. Speed Up Development with Logger
    2. Create Custom Template with LoggerUtil
    3. DBMS_DB_VERSION

    11 June 2015

    Deadlock with a Virtual Column

    Update: There is already a bug filed for this issue, it is registered under number: 22591494

    Virtual Columns are really cool. I like them a lot. If you've never heard of them, shame on you, learn about them.
    In short: a Virtual Column is not a real column, it's an expression that looks like a column... more or less.
    While using the Virtual Columns, we ran into a little oddity with them.

    First of all let's start with the version of the database that I tested this on. Yes, I know it's an 11 database that's because the client is still running on this release.
    These tests were run on the Virtual Box image that is provided by Oracle.
    I still need to run these tests on Oracle 12c.
    I just ran the script on my Oracle 12c database (in a PDB) and the same deadlock occurs.

       SQL> select *
         2    from v$version
         3  /
    
       BANNER
       ----------------------------------------------------------------------
       Oracle Database 11g Enterprise Edition Release 11.2.0.2.0 - Production
       PL/SQL Release 11.2.0.2.0 - Production
       CORE 11.2.0.2.0 Production
       TNS for Linux: Version 11.2.0.2.0 - Production
       NLSRTL Version 11.2.0.2.0 - Production
    

    The setup for this test is based on a copy of the EMP table.

    SQL> create table emp
      2  as
      3  select *
      4    from scott.emp
      5  /
    
    Table created.
    

    To create a Virtual Column on my copy of the EMP table, I need a deterministic function.
    This function takes two arguments, one for the ENAME and one for the EMPNO. And what does the function do? Actually nothing, it returns NULL.

       SQL> create or replace
         2  function vc
         3    (p_ename in emp.ename%type
         4    ,p_empno in emp.empno%type
         5    )
         6   return varchar2 deterministic
         7  is
         8  begin
         9   return null;
        10  end vc;
        11  /
    
       Function created.
    

    The function needs to be deterministic because that is required when you want to define a Virtual Column.
    Now we can add the Virtual Column (called VC) to my copy of the EMP table.

    SQL> alter table emp
      2  add descr as (vc (ename, empno))
      3  /
    
    Table altered.
    

    So far, no problems. It all works.
    The trouble began when you execute a TRUNCATE TABLE statement.

       SQL> truncate table emp
         2  /
       truncate table emp
              *
       ERROR at line 1:
       ORA-04020: deadlock detected while trying to lock object ALEX.EMP
       

    To be honest, this is not the first deadlock that I created and it probably won't be the last :)
    The snag with deadlocks is trying to figure out what caused it in the first place.
    Of all things that I thought would happen, a deadlock is not one of them.
    How can it? It is my own personal VirtualBox and I am the only one using it.

    The first step investigating a deadlock is usually the alert.log, however there was nothing in it regarding the deadlock... honest.

    After a bit of googling, I found a note on deadlocks by Yong Huang (link at the bottom) describing the causes of deadlocks.
    In that article he points out that you can get more insight if you set a certain event, and that's what I did.

       SQL> alter session set events '4020 trace name processstate forever, level 10'
      2  /
      
    Session altered.
       
    To find out where the trace file was located, and the name of it, I used a query by Tanel Poder (link at the bottom).
          SQL> select value ||'/'||(select instance_name from v$instance) ||'_ora_'||
         2 (select spid||case when traceid is not null then '_'||traceid else null end
         3       from v$process where addr = (select paddr from v$session
         4       where sid = (select sid from v$mystat
         5           where rownum = 1
         6      )
         7         )
         8 ) || '.trc' tracefile
         9* from v$parameter where name = 'user_dump_dest'
       SQL> /
    
       TRACEFILE
       -------------------------------------------------------------------------------------------------
       /home/oracle/app/oracle/diag/rdbms/orcl/orcl/trace/orcl_ora_3791.trc
       

    In that trace file was the following information:

       A deadlock among DDL and parse locks is detected.
       This deadlock is usually due to user errors in
       the design of an application or from issuing a set
       of concurrent statements which can cause a deadlock.
       This should not be reported to Oracle Support.
       The following information may aid in finding
       the errors which cause the deadlock:
       ORA-04020: deadlock detected while trying to lock object ALEX.EMP
       --------------------------------------------------------
        object   waiting  waiting       blocking blocking
        handle   session     lock mode   session     lock mode
       --------  -------- -------- ----  -------- -------- ----
       0x31ae0d7c  0x3aab3cf4 0x31afc4c0    X  0x3aab3cf4 0x31aeb718    S
       
    As you can see in the text (taken from the trace file), you can see that the sessions involved in the deadlock is the same, both the waiting and the blocking session are 0x3aab3cf4.

    So at least my assumptions were correct, I was blocking myself.
    Not that it got me any further...

    After quite a long time fiddling around, I discovered the following.
    If I change the function like below, the deadlock doesn't occur. See if you can spot the difference.

       SQL> create or replace
      2  function vc
      3    (p_ename in varchar2
      4    ,p_empno in number
      5    )
      6   return varchar2 deterministic
      7  is
      8  begin
      9   return null;
    10  end vc;
    11  /
    
    Function created.
    
    SQL> truncate table emp
      2  /
    
    Table truncated.
    

    Did you spot the difference?
    The function at first used anchored datatypes for the arguments (%TYPE) and later on just a simple type (NUMBER and VARCHAR2).
    Using the simple types, the truncate works.
    There are some oddities when it exactly occurs and I haven't figured out yet when the deadlock occurs exactly. It seems that when an argument is anchored (%TYPE) and the underlying datatype is a NUMBER, the deadlock occurs...
    Like I said I haven't really figured out what causes it.

    Links

    1. Two common Deadlocks by Yong Huang
    2. Tanel Poder: Querying the current tracefile name, using SQL – with tracefile_identifier
    3. Oracle Base on Virtual Columns

    09 May 2015

    LoggerUtil: Create a Custom Template

    Since I have written about my pet project about a month ago, I have made some major changes to the functionality of it.
    If you haven't read that blog about my pet project, here's the synopsis:

    I love Logger to instrument my code, I just don't like to type in all the bits and pieces to register all the input arguments when I write a new procedure or function. To solve this problem I have written a generator which takes the (packaged) procedure name and generates the body with all the instrumentation code in place. The only thing left to do is focus on the functionality that needs to be implemented in the first place.

    First of all the name of the package changed. Now it is called LoggerUtil, which I believe is more inline with the functionality.
    But that is only a minor change. The big change is that it is now possible to create your own templates for Procedures and Functions.

    The basic mechanism to generate a template is the same as before, see my previous blog for an example or refer to the README.md file on the project page.

    In order to use custom templates, you will need to use Logger release 3.0.1, because the supportive procedure to set and get custom preferences. Unfortunately it is not possible to use conditional compilation checking the version of Logger that you have installed.
    To create a custom template you can use the procedure called "set_custom_template". This procedure takes two arguments:

    1. P_TYPE: which kind of template do you want to store; a (F)unction or (P)rocedure.
    2. P_TEMPLATE: a string containing your custom template
    For example:
    loggerutil.set_custom_template (p_type     => 'P'
                                   ,p_template => 'your_custom_template'
                                   );
       
    The custom template is stored in the standard LOGGER_PREFS table with the custom preferences:
    • CUST_FUNCTION_TEMPLATE
    • CUST_PROCEDURE_TEMPLATE
    Because of the current limitations of the LOGGER_PREFS table, your custom template cannot be longer than 255 characters.
    There are some placeholders that you can use your custom template:
    #procname#
    The name of the procedure or function.
    #docarguments#
    All the arguments are listed (IN, OUT and IN/OUT). Handy for when you want to use this in the comments section. The text (or spaces) before the placeholder is placed before each argument.
    #logarguments#
    Only the IN and IN/OUT arguments are used for calls to Logger.

    When you want to reset the custom templates and go back to the original use:

    loggerutil.reset_default_templates;
       

    You can find the LoggerUtil project on Github.

    07 May 2015

    Splitting a comma delimited string the RegExp way, Part Three

    The article read most often on this blog is called "Splitting a Comma Delimited String, the RegExp way".
    On this blog there are two articles about this technique, one is about splitting up a single string into multiple rows and the other is about multiple strings into multiple rows.
    Links to both articles are included at the bottom of this article.
    It seems like there is a need for functionality like that frequently. And just to add to those two articles on the subject, here is a third one combining the first two articles.

    Recently I was asked for help in a comment on how to go about and split up a string like the following

          'ABC/FDF,RET/YRT,UYT/ERT'
       
    The expected outcome would be
          ABC
          FDF
          RET
          YRT
          UYT
          ERT
       

    As you can see the input string consists of two different delimiters, namely a comma and a forward slash (/).
    To split this string up, you will need both techniques from the other articles.

    Let's start with a variable containing the input string.

          SQL> var input varchar2(150)
          SQL> 
          SQL> exec :input := 'ABC/FDF,RET/YRT,UYT/ERT'
    
          PL/SQL procedure successfully completed.
       

    The first step is to split the string up using the first method, split up the string using the comma as a delimiter.

    SQL> select regexp_substr (:input, '[^,]+',1, rownum) str
      2    from dual
      3   connect by level <= regexp_count (:input, '[^,]+')
      4  ;
    
    STR
    -------
    ABC/FDF
    RET/YRT
    UYT/ERT
       
    This will leave us with three records each consisting of a string that needs further splitting up, but this time with the forward slash as the delimiter.

    Using these rows as the input in the next phase, use the technique described in the second article.
    By introducing Subquery Factoring (lines 1-5), create a named query "commas"

       SQL> with commas
         2  as
         3  (select regexp_substr (:input, '[^,]+',1, rownum) str
         4    from dual
         5   connect by level <= regexp_count (:input, '[^,]+'))
         6   select regexp_substr (str, '[^\/]+', 1, rn) split
         7   from commas
         8   cross
         9   join (select rownum rn
        10       from (select max (regexp_count(rtrim (str, '/')||'/', '\/')) mx
        11        from commas
        12     )
        13    connect by level <= mx
        14    )
        15   where regexp_substr (str, '[^\/]+', 1, rn) is not null
        16   ;
    
       SPLIT
       ----------------------------------
       ABC
       FDF
       RET
       YRT
       UYT
       ERT
    
    The forward slash has special meaning with regular expressions it needs to be escaped using a backslash.
    You can see this on lines 6, 10, and 15.
    What is interesting, or at least I find interesting, is the use of the RTRIM on line 10.
    Each value per line is not completely delimited by the forward slashes, the trailing one is missing. Just to concatenate one to each line would be to easy, what if there is a trailing slash?
    The RTRIM removes the trailing slash and concatenates one at the end, making sure that the string is split up at the right place.

    Links

    24 April 2015

    Refresh Multiple Materialized Views in One Go: No Data Found

    To refresh multiple Materialized Views you can use the DBMS_MVIEW package, with the procedure aptly named Refresh. One method is to provide a comma-separated list of Materialized View names, or you can use an DBMS_UTILITY.UNCL_ARRAY to achieve the same objective.
    When using the latter method, I stumbled upon this oddity (which is not in the current documentation, or at least I couldn't find it).

    The procedure that I initially wrote was the following:
    create or replace 
    procedure refresh_mviews
    is
       l_mviews dbms_utility.uncl_array;
    begin
       l_mviews(1) := 'ABC_MV';
       l_mviews(2) := 'DEF_MV';
       l_mviews(3) := 'GHI_MV';   
       dbms_mview.refresh (tab => l_mviews);
    end refresh_mviews;
    /
    

    On line 4 a local variable is declared on the type DBMS_UTILITY.UNCL_ARRAY. The declaration of this type is

    TYPE uncl_array IS TABLE OF VARCHAR2(227) INDEX BY BINARY_INTEGER;
    
    On lines 6 through 8 the array is filled with the names of the Materialized Views that I want to refresh.
    The actual refresh is done on line 9.

    When executing the code above, the following exception is raised:

    Error report -
    ORA-01403: Geen gegevens gevonden.
    ORA-06512: in "SYS.DBMS_SNAPSHOT", regel 2809
    ORA-06512: in "SYS.DBMS_SNAPSHOT", regel 3025
    ORA-06512: in "ALEX.REFRESH_MVIEWS", regel 13
    ORA-06512: in regel 2
    01403. 00000 -  "no data found"
    *Cause:    No data was found from the objects.
    *Action:   There was no data from the objects which may be due to end of fetch.
    
    Strange...

    After some googling I found some old documentation (from Oracle 9i) describing the functionality of the REFRESH procedure in the DBMS_MVIEW pacakge:

    If the table contains the names of n materialized views, then the first materialized view should be in position 1 and the n + 1 position should be set to NULL.
    This explains the exception that is being raised.

    Adding line 9 in the code below fixes this problem:

    create or replace 
    procedure refresh_mviews
    is
       l_mviews dbms_utility.uncl_array;
    begin
       l_mviews(1) := 'ABC_MV';
       l_mviews(2) := 'DEF_MV';
       l_mviews(3) := 'GHI_MV';   
       l_mviews(4) := null;
       dbms_mview.refresh (tab => l_mviews);
    end refresh_mviews;
    /
    

    Documentation

    1. Oracle 9i Documentation
    2. Oracle 12c Documentation

    17 April 2015

    APEX 5: forgot the images?

    On my play environment I usually use Oracle APEX with the Embedded PL/SQL Gateway, just because it's so easy.
    When a new version of APEX is released, just like everybody else, I upgrade my play environment.
    After the apexins.sql script is run, I always want to start playing with it immediately. Usually it is at this point where I just see a blank page... scratching my head wondering why it is not running,... having to go back to the documentation to realise I forgot the last step - configure the EPG...
    Now with APEX5 an alert is shown when you forget the last step:

    Immediately you know what to do... :)
    Another one of those little enhancements that makes APEX5 simply awesome.

    08 April 2015

    Speed Up Development with Logger: Generate a Template

    Instrumentation of PL/SQL code is essential. My favourite tool to instrument PL/SQL is Logger.
    Martin Giffy D'Souza wrote a few blogs on how to speed up development with Logger and I want to chime in with my own productivity booster.
    What I have written is a PL/SQL package that will generate a Procedure or Function body with all the calls to Logger. This includes all the arguments, or at least the IN and IN/OUT arguments.
    When an exception occurs, it is quite handy to have all the arguments at your disposal to make it easier to debug your code. But to include the arguments manually when you are writing code is quite a lot of work.
    You can download (or fork or whatever) the package on GitHub.

    How does it work?

    Install the package, which contains a single procedure called Template.

       procedure template (p_procedure  in varchar2
                          ,p_standalone in boolean := false
                          );
    
    The Template procedure has two arguments; one for the complete (pacakged) procedure name, and one to indicate if it is standalone (not pacakged) or not.

    When you have written the procedure (or function) signature, something like

    create or replace package demo_pkg is
       
       procedure test (p_arg1 in     varchar2
                      ,p_arg2 in out varchar2
                      ,p_arg3 out    varchar2
                      );
    
    end demo_pkg;
    /
    
    ... and when it compiles successfully, then you can generate the stored procedure body using my generator_pkg.
    The package uses DBMS_OUTPUT to show the template, so you should set the serveroutput on in SQL*Plus.
    set serveroutput on format wrapped
    
    begin
       generator_pkg.template ('demo_pkg.test');
    end;
    /
    
    This will generate the following:
       is
          l_scope  constant varchar2(61) := g_package||'test';
          l_params logger.tab_param;
       begin
          logger.append_param (p_params => l_params, p_name => 'p_arg1', p_val => p_arg1);
          logger.append_param (p_params => l_params, p_name => 'p_arg2', p_val => p_arg2);
          logger.log_information (p_text => 'Start'
            ,p_scope => l_scope
            ,p_params => l_params
            );
          [==> Actual Program goes here ==]
          logger.log_information (p_text => 'End'
            ,p_scope => l_scope
            );
       end test;
    
    Because it is a packaged procedure the l_scope variable contains a reference to g_package.
    Each of my packages contains a Global Constant called g_package which is defined as
       g_package constant varchar2(31) := $$plsql_unit || '.';
    

    Now that the template is generated, simply copy-and-paste it in your editor and start to write the actual program where it says

       [==> Actual Program goes here ==]
    
    And that's it, now you have a starting point for development including the references to Logger.

    The blogs that Martin wrote:

    03 March 2015

    APEX: Active Tabs Based on Page Groups

    Recently someone asked me: "How did you do that? When I include an APEX page in a Page Group, the correct tab is automatically highlighted"
    When I setup an application, I usually use Dimitri Gielis' method, so instead of using "real tabs", I use a List and display that list as Tabs.
    For each of the "Tabs", I also create Page Groups, just to keep things organized.
    Each of the List Entries will have a PL/SQL Expression for "List Entry Current for Pages Type" based on the Page Group that the "Tab" should be active.
    The function queries the APEX Repository, and more specifically APEX_APPLICATION_PAGES.
    function page_in_group(
             p_app_id     in number ,
             p_page_id    in number ,
             p_page_group in varchar2 )
       return boolean
    is
       l_retval boolean;
       l_dummy  number;
    begin
       begin
           select 1
             into l_dummy
             from apex_application_pages
            where application_id = p_app_id
              and page_id            = p_page_id
              and page_group         = p_page_group;
           l_retval := l_dummy = 1;
       exception
          when no_data_found then
             l_retval := false;
       end;
       return l_retval;
    end page_in_group;
    
    Placing the Page in the correct Page Group will now "automatically" highlight the correct "tab".